

How To Clean Ps4 Without Compressed Air
If you've had a PlayStation 4 for a while, chances are that information technology runs a lot louder than it did when you bought information technology. Like with almost devices, grit tends to build up over time inside the system.
To keep your PS4 running at its all-time, information technology'due south wise to open and clean your system every once in a while. To repose it downwards and remove all that nasty dust buildup, follow our guide to cleaning your PlayStation four. We'll take you through everything you demand to know, including what screwdriver you demand to open up the PS4 and how to clean the PS4's fan.
Warning: Have Care When Cleaning Your PS4
While this is a relatively straightforward process, you lot should still accept care when taking autonomously and cleaning your PS4. The cleaning procedure doesn't require you to tear the system down much, thankfully. We cannot exist held responsible for any damage you lot may do to your system. Information technology's a good idea to make sure you've backed up your PS4 save data before proceeding, merely in instance.
If you have an original model PS4, opening your console and cleaning information technology volition void your warranty. However, given the PS4's age, this is no longer a concern. Y'all can remove the cover from the PS4 Slim and PS4 Pro models without voiding the warranty.
We'll evidence steps for cleaning the original PS4 in this guide (since it's the ane I have, and the most complicated). At the end, nosotros'll mention how PS4 cleaning works for the other models.
With all that out of the manner, let'due south expect at how to clean your PS4.
Pace 0: What You'll Need for Cleaning a PS4
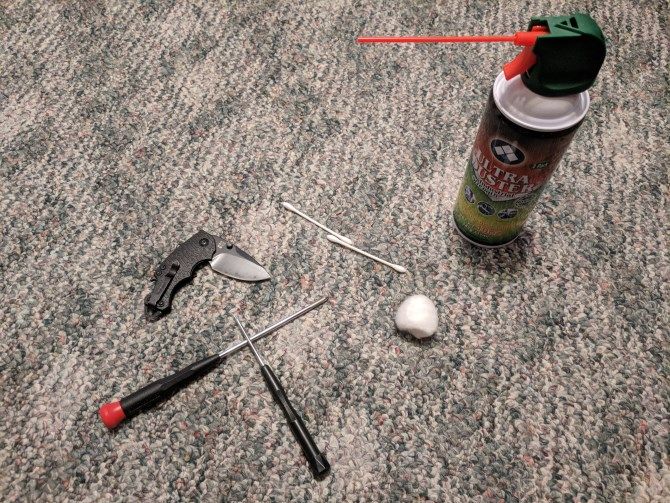
PS4 cleaning is a relatively elementary job, but does crave a few materials:
- A TR9 Torx security bit screwdriver. The PS4 uses TR9 security screws. A TR8 screwdriver may work, only you lot should use a TR9 for the best results. Make sure you get a screwdriver with a security bit, which has a tiny hole in the middle.
- If you don't have this already, consider the TECKMAN PS4 cleaning repair toolkit, which has the necessary screwdriver plus a few more than handy tools. If you already take a Torx set or calculator opening toolkit, information technology probable has the bit you need.
- A standard Phillips-head screwdriver. There are a few screws inside the PS4 that crave this screwdriver to remove. A smaller screwdriver volition work best here.
- A knife or other sharp object. You'll need this to skin off the stickers covering the PS4'southward rear screws.
- A tin of compressed air. You'll need this to blow out the grit. You tin purchase canned air online at Amazon, or in stores like Walmart.
For more efficient cleaning, you may too want to use these optional only recommended materials:
- Cotton swabs and/or cotton assurance. If you lot'd like, you tin can use these to help you remove some dust. A cotton swab also helps you go on the fan from spinning when yous blow air at it. If you want to go above and beyond, endeavor making some cleaning putty and using that instead.
- A flashlight. Information technology can be tough to come across where the dust hides; a flashlight makes it easier to spot.
- A paper towel, piece of tape, or small bowl to hold the screws. You don't want your PS4's tiny screws to become missing, so it's a good idea to have somewhere to keep them. When removing the screws, you may want to place them in the same blueprint you removed them, so you know which goes where.
- A cleaning brush or old toothbrush. Grit caked onto the PS4'south fan is difficult to remove, since the blade gaps are so small. A brush can scrape off whatever the canned air can't clear out.
Step i: Close Downward Your PS4 and Unplug Everything
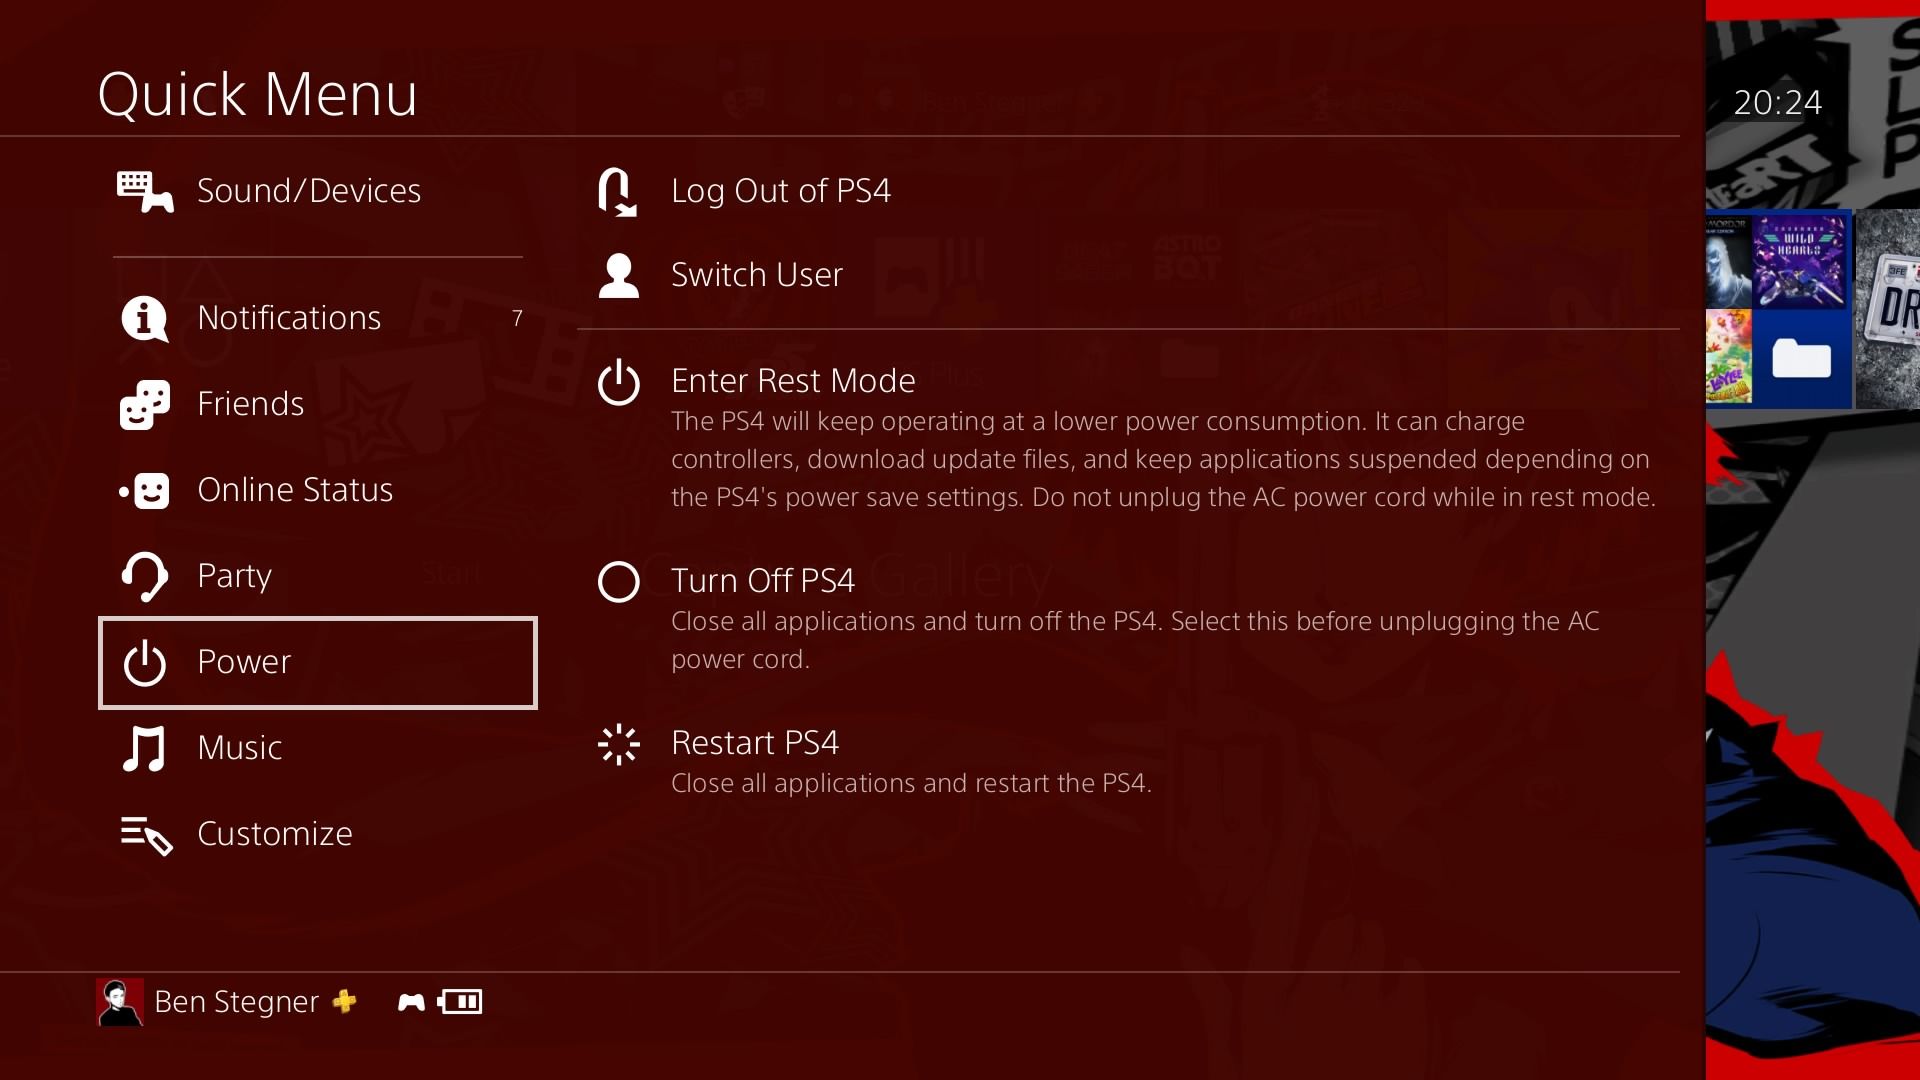
Before you start cleaning your PS4, make sure the console is turned off. It should accept no lights on the top; if you see an orange low-cal, then it's in Rest Manner (a low-ability state) and you'll need to shut it down fully.
To fully close down your PS4, make certain the console is on, and then press and hold the PlayStation button on your controller to open the Quick Menu. Head to Ability > Turn Off PS4. Wait until all lights on your PS4 turn off, then unplug the power cable, HDMI cord, and annihilation else connected to it (similar USB devices).
Bring your PS4 to a place where you lot take some room to work. Since you'll exist removing pocket-sized screws, you should have a condom place to set them.
Like when edifice a PC, yous should accept care not to build up static electricity. Don't piece of work on a static-decumbent surface, such equally a shaggy carpet, and attempt to merely touch the plastic components when cleaning.
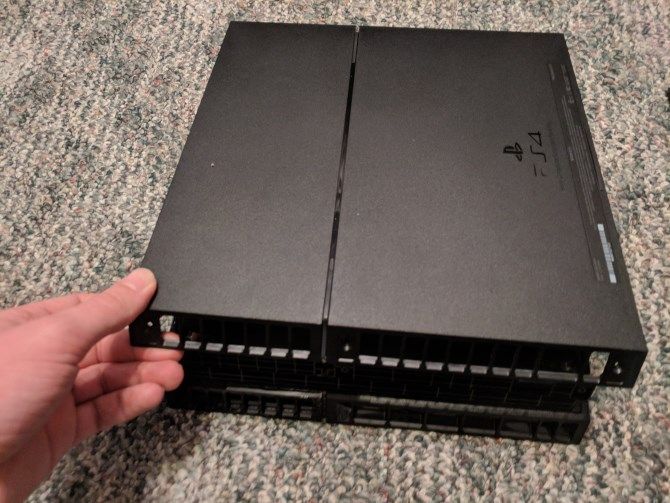
Step ii: Remove the Back Stickers and Screws
Now that you've got your PS4 ready to work, turn it around so the back is facing y'all, then flip it upside-down. You'll meet three stickers along the "top" (which is really the bottom of the system, in line with the power port) that you must remove.
Notation that if you have the slightly revised model of the original PS4, you lot'll just see ane sticker and screw here in the middle.
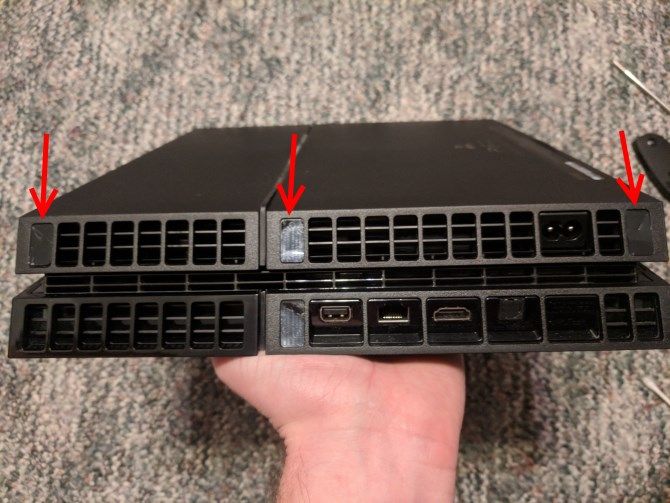
The heart one has a special warranty sticker that damages itself when you remove information technology. The other two are a fleck thicker and might require a bit of actress work to skin off. Utilize your knife or another pointed tool to peel back a corner of the stickers, and then they should come off easily. Exist careful not to scratch your arrangement while you lot remove them.
Set them aside if you want to re-utilise the stickers afterwards, or throw them out if y'all don't care. Once you've removed the stickers, use your TR9 screwdriver to remove the screws underneath. They're short, and then they shouldn't require much effort. Take care not to strip them, and set them aside in a safe identify.
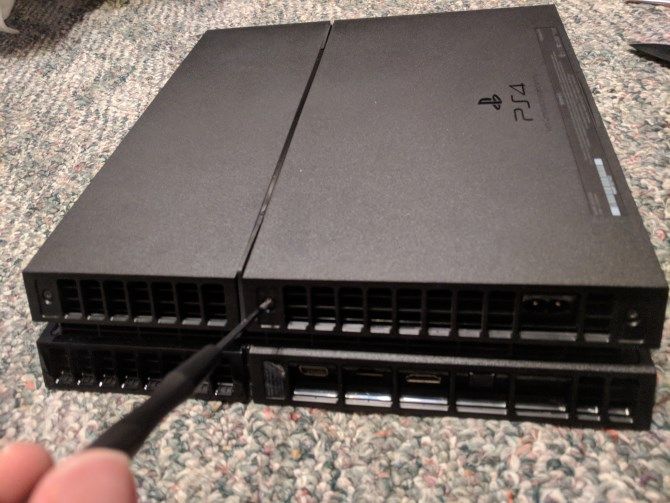
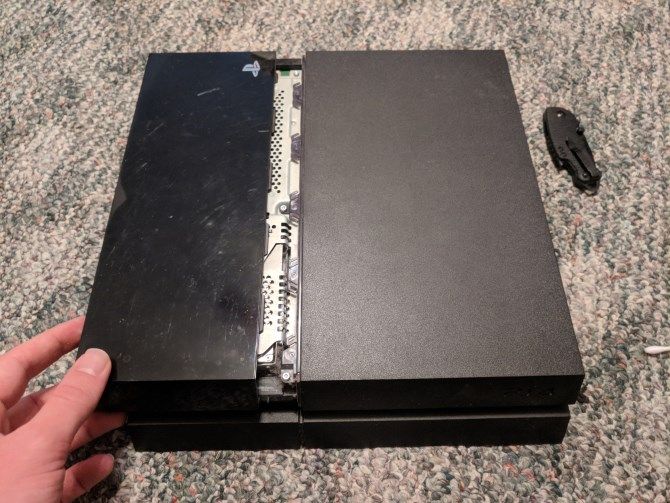
Step 3: Remove the PS4's Cover
At present that you've removed the screws(due south) property the embrace in place, you tin pop it off. Start at the back (the part with the screws, facing you) and lightly pull up on the edges. Don't use a ton of strength; as you lot work your way around the PS4, the encompass should come free. Tug it up and remove it.
At this point, you can look at the cover you just removed and clean whatsoever dust within. Your compressed air will brand curt piece of work of information technology; this is besides a skilful place to use a cotton ball to dab any remaining debris out. Later cleaning the encompass, set information technology aside for now.
Dorsum on the system, y'all can now come across the PS4's fan, which acts as a good indicator of how dusty your organization is overall. However, there'southward one more component to remove outset and then you can reach everything you need to clean.
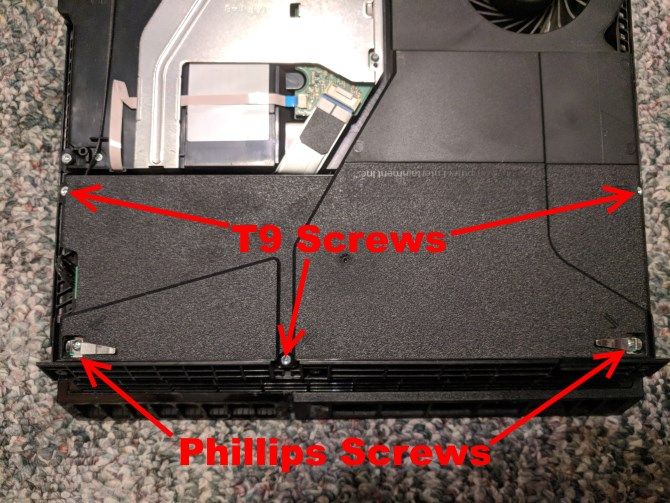
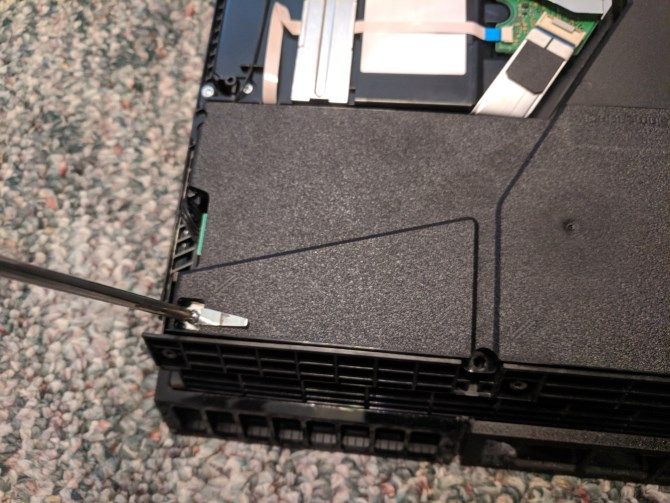
Footstep four: Remove the Power Supply
You're nearly there! Now you just need to remove the power supply unit (PSU) then you can gain access to the heat sink and perform the most thorough cleaning. There are v screws holding the PSU in place. 3 of them employ the same TR9 security screws every bit the back embrace, and the other 2 are standard Phillips head screws.
With the PSU on the side closest to you and the fan in the upper-right corner, the ii Phillips head screws are at the corners of the organisation, to the far left and far correct of the PSU. Employ your TR9 screwdriver to remove the other three screws.
Note that if you lot're using the slightly revamped model of the original PS4, you'll run across one screw in a different location hither. The TR9 spiral in the upper-left of the below photo will be a few inches above the TR9 screw at the bottom instead.
The Phillips screws are longer than the others and are a bit tougher to remove, so yous may need to slide your knife or another thin object under the attached clips to pull them up. Take care to not bend the clips when doing this.
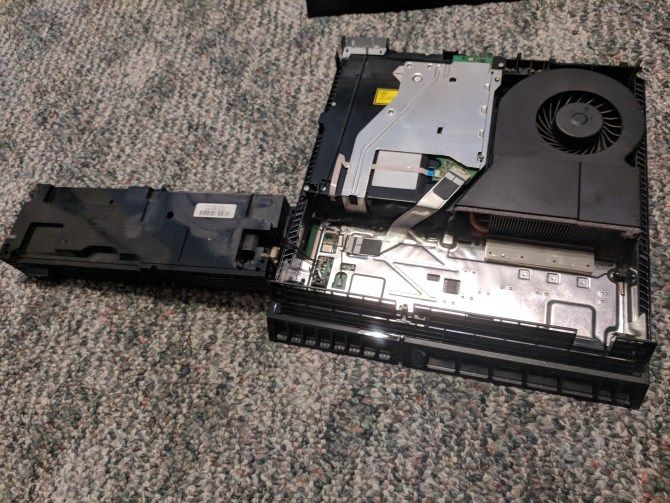
Now yous can remove the PSU. There's a cable connecting it to the motherboard underneath, which you don't need to remove and don't want to accidentally unplug. Advisedly grab the PSU by both sides and elevator it up evenly. Information technology may take a chip of fluctuant to come free.
In one case you've got it lifted up, gently "flip" it over the left side so it rests carefully, while staying plugged in.
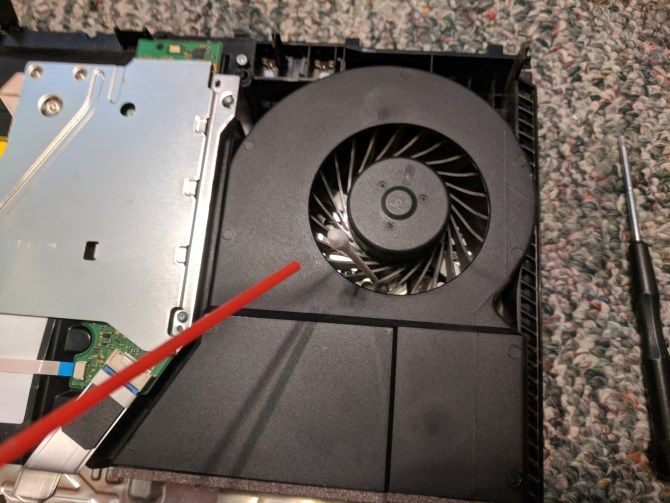
Step 5: Blow the Dust Out of Your PS4
Finally, you lot have access to the PS4's heat sink and fan. Now we can explicate how to make clean your PS4's fan and remove dust that's deep in the organisation.
Take your tin can of compressed air and, if it has ane, insert the straw for more focused cleaning. Spray a few blasts of air abroad from your PS4 first, in case there's any liquid in the tip.
Now, utilize your canned air to blow short bursts of air all around your PS4, getting rid of the grit. Make certain to check the corners for hidden dust (your flashlight can help here), and take care to blow information technology out of the arrangement instead of further in. You lot tin can also employ your cotton swabs or cotton assurance to assist yous remove any dust the air won't reach.
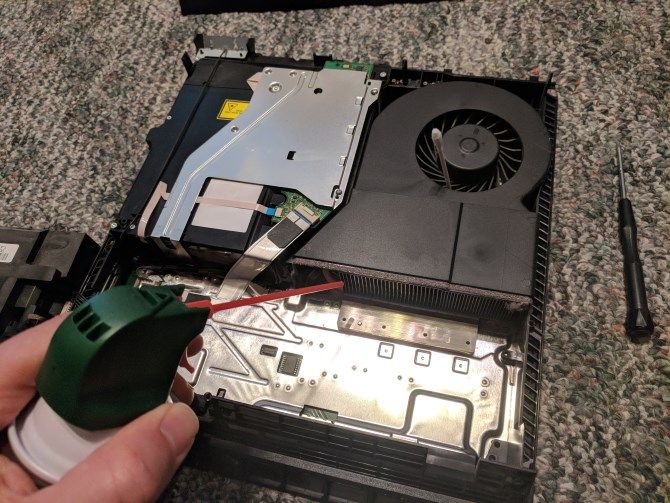
Focus especially on the fan, oestrus sink, and exterior edges of your PS4 when looking for built-up dust, as these are common locations for it. If you're non familiar, the heat sink is the metal prepare of "bars" that the straw is pointing at in the above picture.
Note a few important warnings when using canned air:
- Never hold the can upside-downwardly. This will force the liquid within the tin can out and could damage your PS4.
- Do not spray compressed air direct into the fan. Spinning the PS4's fan at an extreme speed could damage the circuitry. Before yous blow air near the fan, make sure you're either holding it with a finger or take jammed it with a cotton wool swab.
- Use compressed air in ventilated areas simply. Canned air will bother your pare and other body parts, and information technology'south dangerous to exhale information technology in for an extended time. If you experience empty-headed, stop using it and move to fresh air.
- Spray in bursts. Belongings a steady spray of air will quickly cool the tin can, making information technology difficult for you to handle.
Once you're done with the compressed air, you can apply your brush and cotton swabs to remove any stubborn or leftover buildup.
Step 6: Reassemble Your PS4
Once yous're satisfied with your work cleaning out your PS4, it's time to put everything back together in contrary order.
Offset, carefully "flip" the power supply over and put information technology dorsum in its spot. You'll notice 2 prongs in the lesser-left corner; make certain those line upward with the gap in the PSU.
Replace the five screws belongings the PSU in place. Remember that the two on the bottom-left and lesser-right corners are the longer Phillips caput screws with clips. The other three are TR9 security screws.
Next, snap the encompass back into identify. Beginning from the front of the system (brand sure you don't have the cover astern). Lightly press down all around the edges of the organisation to make sure it'south secure. When done, it shouldn't wiggle.
At present, replace the TR9 screws on the back of the PS4. Take care not to harm them when screwing them back in. If y'all decided to go on the sticker(due south) that cover the back screws, replace them now. The warranty sticker will appear scratched; this is by design.
At present your PS4 is all cleaned out and put dorsum together, just in that location'due south an additional spot you might want to quickly check.
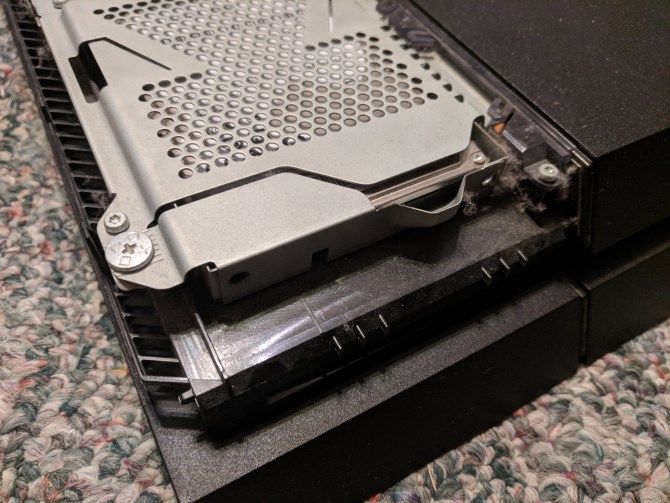
Step 7: Clean Your PS4's HDD Bay (Optional)
The PS4 has a separate compartment for the hard drive that may or may not have built up dust. It's non vital to cheque, just it'due south worth taking a moment while you lot have your system out.
To access information technology, lightly press and slide the shiny part of your PS4 cover (on the left when looking at it from the forepart) straight out to the left. This will remove the cover, allowing y'all to access the HDD bay.
A single Phillips caput screw adorned with the PlayStation button icons holds it in place. Remove this, then pull the HDD to make room to clean out any dust in this surface area using the same methods as above. When you're done, slide the HDD back in, supervene upon the spiral, and slide the comprehend on.
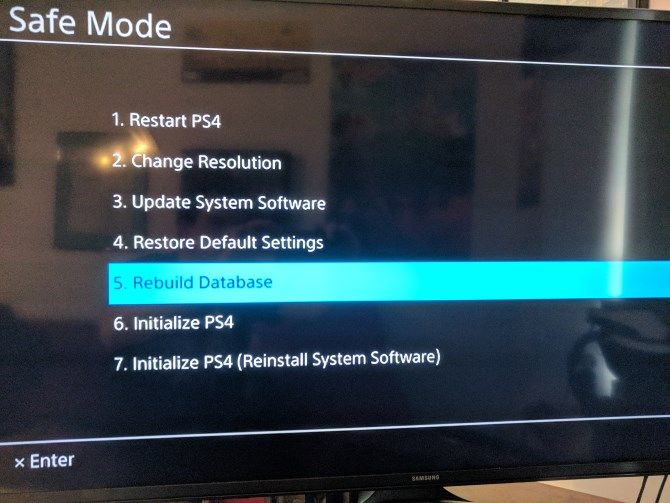
Step 8: Perform a PS4 Database Rebuild (Optional)
Now you tin can put your PS4 back in its usual spot and plug all the cables back in.
One final stride isn't strictly necessary, but since you've only cleaned out your PS4's hardware, information technology'due south a proficient time to optimize its software performance as well.
The PS4 includes a utility called Rebuild Database that optimizes all the data on your drive, similar to defragmenting your computer. If you've had your PS4 long plenty to build up significant grit, chances are information technology could benefit from this operation too.
To admission it, shut down your PS4 (fully, so it'due south not in Residuum Mode). Once it'southward off, press and hold the Power button on the front of the console (the top push button). Yous'll hear one beep correct away; continue holding it until you hear a 2nd beep. This boots the PS4 into Safe Mode.
Connect your controller to the PS4 with a micro-USB cable, then press the PlayStation button to sync it. Select the Rebuild Database choice and confirm the operation. Your PS4 will then perform the process.
The system says this could take some time depending on how much data y'all have. However, in our case, it didn't accept more than 15 minutes or so with nearly 2TB of data on the hard drive. In one case information technology completes, you lot'll be dorsum at your abode screen.
This process doesn't delete whatsoever of your information, but it does have a few small consequences. The PS4 will show yous Observe notifications again for basic tips you've probably already seen. Your Home screen won't show your recently played games, so you'll have to track them downwardly manually once. And your PS4 will also bank check for and install updates for games you haven't played in a while.
One time y'all've done this, you should hopefully notice your PS4 runs a flake smoother in the menus. It'southward not a bad idea to perform this operation regularly to go on your PS4 performance optimal.
How to Clean the PS4 Slim and PS4 Pro
To clean the fan on the PS4 Slim, y'all don't need to remove the warranty sticker. It's much easier to remove the comprehend, also. All you lot have to practice is pull up on the left and right corners on the front of your arrangement. Pull on the middle, and then slide the cover back and information technology will come right off.
From here, yous'll be able to meet the fan fifty-fifty though it's obstructed by a embrace. If your fan doesn't look too dirty (a flashlight volition assist with this), you tin can spray some canned air into it and probably call it a day. Remember to use a cotton swab to forbid the fan from spinning.
For full cleaning, yous'll need to remove several screws from the comprehend and the power supply plate. Since we focused on the original PS4 here, please see the video below for PS4 Slim-specific instructions.
The PS4 Pro is similar, but it'due south even simpler. Simply pull up on the front left and right corners to loosen the comprehend, so slide it back. You tin can see the fan every bit soon as you remove this, making basic cleaning quite easy.
Unfortunately, the heat sink is buried deep in the PS4 Pro, and accessing it requires disassembling almost the entire panel. Thus, you lot should stick to merely cleaning the fan if you have a PS4 Pro. Cheque the beneath video for more details.
Now Your PS4 Is All Clean
After walking through the to a higher place, you've opened and cleaned your PS4 fully. You lot should notice it running much more quietly than it was before, particularly if you've had the arrangement for years. While you could clean even deeper into the organization, doing so would require some potentially risky operations. Information technology's better to avoid dissentious your system and stick to this basic cleaning.
For future maintenance, have a brush, some compressed air, or a cotton swab along the outside edges of your system to remove the dust once in a while. This should help prevent debris from edifice up inside, so you don't have to go through this process as often.
Some people have recommended placing plastic canteen caps or like small-scale objects under the four corners of your panel. This lifts it off the below surface and should help increase airflow. Aside from this, brand sure your PS4 has room to breathe (keep information technology out of enclosed spaces). Paired with the to a higher place cleaning process when needed, your PS4 should stay absurd and quiet.
Meanwhile, make sure you lot're getting the best from your PS4 in other means, too.
Source: https://www.makeuseof.com/tag/clean-dust-playstation-4/
0 Response to "How To Clean Ps4 Without Compressed Air"
Post a Comment