

Windows Server 2012 R2 Passwort Zurücksetzen
Introduction
TL:DR: Load whatever required Storage/RAID controller drivers earlier attempting to reset Windows password via the installation media in a VMware environment.
I recently found myself in the position of having to reset the Windows (2012 R2) domain admin password in a virtual (VMware) lab surround. This procedure involves temporarily replacing the Utilman.exe executable on the system install drive with a re-create of the cmd.exe file. However, my domain controller was a VM on ESXi that required a 3rd political party SCSi driver be loaded in order to view the Bone drive/install.
The easiest method of loading this driver is to re-create your drivers to a virtual floppy deejay or .iso image and mountain it on an additional virtual CD/DVD drive and so kicking the VM from your Windows installation media .iso to proceed with the password reset process.
Instructions
Using the following steps you tin can reset the admin password on the Windows 2012 R2 domain controller:
-
Boot from the Microsoft Windows Server 2012 DVD
-
From the Windows Setup carte, click "Next".
-
Select "Repair your computer"
-
Under Choose and option, click on "Troubleshoot".
-
Under Avant-garde options, click "Command Prompt".
-
At the command prompt, run the post-obit command to determine the drive letters in use on the server:
wmic logicaldisk get explanation, description,filesystemTen:\Sources> wmic logicaldisk go explanation,clarification,filesystem Caption Clarification Filesystem A: iii 1/two Inch Floppy Drive D: CD-ROM Disc UDF X: Local Fixed Disk NTFS -
Utilize the
drvloadcommand in order to load the paravirtual SCSi driver from the disk/image mounted via your additional bulldoze (in my case A: floppy bulldoze):X:\Sources> drvload A:\AMD64\PVSCSI.INF DrvLoad: Successfully loaded A:\AMD64\PVSCSI.INF. -
Run the
wmic logicaldisk get caption,description,filesystemcommand again and you should be able to see the local installation disk now (in my case this was E:):X:\Sources> wmic logicaldisk become explanation,description,filesystem Explanation Description Filesystem A: iii 1/2 Inch Floppy Drive C: Local Fixed Disk NTFS D: CD-ROM Disc UDF E: Local Fixed Disk NTFS X: Local Stock-still Disk NTFSNote: Considering your server is started with bootable media, the System Reserved sectionalization of your hard drive is temporarily marked equally C: and therefore the C: bulldoze that you lot see from within Windows 2012 is marked as Due east: drive (since the CD-ROM Disc is marked as D:). This is a temporary modification. Things will revert to normal as before long as yous boot Windows 2012 commonly.
The 10:\Sources directory is a temporary container that is created when Windows 2012 is booted externally, it allows you to run a host of commands to manage your install.
-
Now switch to your local installation disk (E:) and run the commands to supercede the
Utilman.exefile with a re-create ofcmd.exe:10:\Sources>E: E:\>cd Windows\System32 E:\Windows\System32>ren Utilman.exe Utilman.bak E:\Windows\System32>copy cmd.exe Utilman.exe i file(southward) copied Due east:\Windows\System32> -
Now use the
wpeutilcontrol to reboot your Windows VM:E:\Windows\System32>wpeutil reboot -
One time the VM has rebooted, click the Utility Manager icon to load a command prompt:
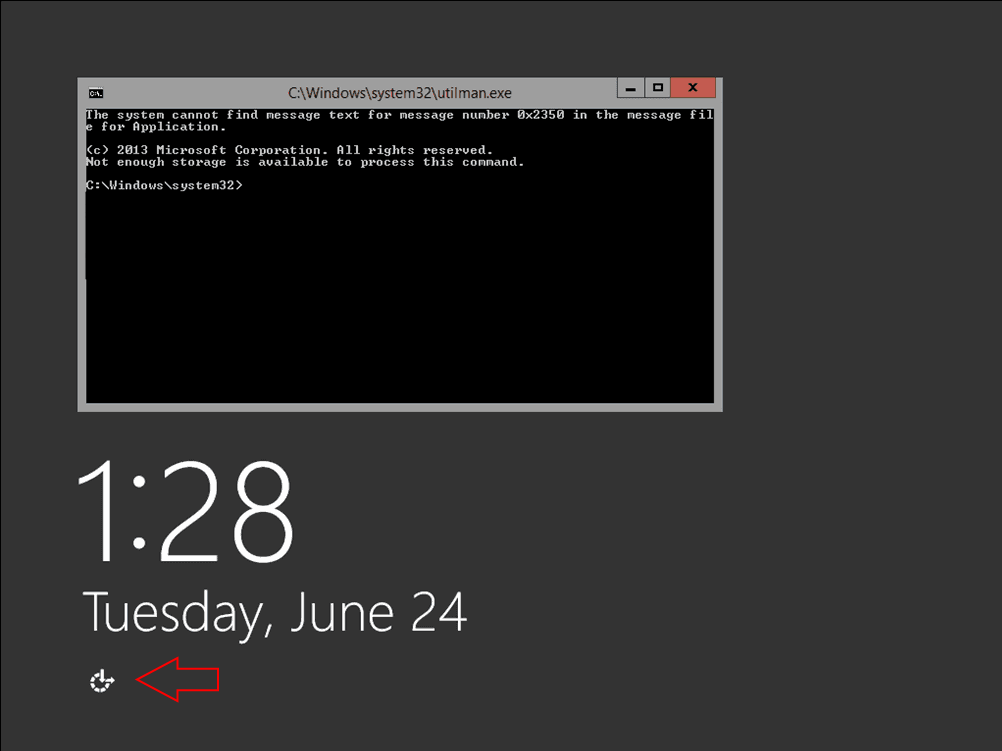 Reset Windows 2012 password (Click Utility Manager Icon) | Windows 2012 R2
 -
Run the post-obit control to reset your Windows 2012 countersign (e.g. 'Password123' case sensitive):
internet user ambassador Password123C:\Windows\System32>net user administrator Password123 The command completed successfully C:\Windows\System32> -
Closing the command prompt, you should now be able to log dorsum onto the server using the countersign you have provided in the last footstep.
Revert Changes
Once you lot've confirmed that you can logon to the server you should restore the Utilman.exe from the earlier backup.
-
Follow steps one to 9 in the Installation section above.
-
Run the post-obit commands to restore the
Utilman.exefromUtilman.bakE:\Windows\System32>del Utilman.exe Due east:\Windows\System32>copy Utilman.bak Utilman.exe 1 file(south) copied E:\Windows\System32>
You tin can at present logout and reboot. Your admin countersign has now been reset.
Sources: http://world wide web.kieranlane.com/2013/09/18/resetting-ambassador-password-windows-2012/

Windows Server 2012 R2 Passwort Zurücksetzen,
Source: https://colinwilson.uk/2019/04/25/resetting-the-administrator-password-on-a-windows-2012-r2-vm-vmware-esxi/
Posted by: ashcarld1976.blogspot.com
0 Response to "Windows Server 2012 R2 Passwort Zurücksetzen"
Post a Comment